|
How to install clear front sidemarkers
the safe way
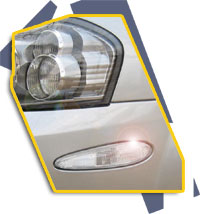 There
are two methods for installing corners: The quick way involving
a flathead screwdriver (outlined in the owners manual) and the safe
way. I chipped the edge of my OEM lens when removing it like the
owners manual suggested. It's also easy to scar your paint if you're
not careful, so I recommend taking a couple extra minutes and playing
it safe. Below are instructions on the safe method for the front
sidemarkers. There
are two methods for installing corners: The quick way involving
a flathead screwdriver (outlined in the owners manual) and the safe
way. I chipped the edge of my OEM lens when removing it like the
owners manual suggested. It's also easy to scar your paint if you're
not careful, so I recommend taking a couple extra minutes and playing
it safe. Below are instructions on the safe method for the front
sidemarkers.
1. Jack up front of car (optional if you're willing to crawl under
vehicle)
2. Under the car beneath the fog lights, there is a black plastic
cover. Remove two bolts from plastic guard
3. Pry out plastic clip on guard with two flathead screwdrivers.
Pry the inner circle away from car and pull the clip free
4.Pull the part of the plastic guard toward the rear of the car
down.
5. Reach up behind the sidemarker with a small screwdriver in hand
and push on the metal release to toward the front of the lens to
pop the lens free.
6. Twist bulb housing counter-clockwise to remove the bulb and
free the sidemarker from the car.
7. Install in reverse order.
| |
Did this help you out? Feel free to throw us a bone to help keep housecor's how-to's hosted!
|
|